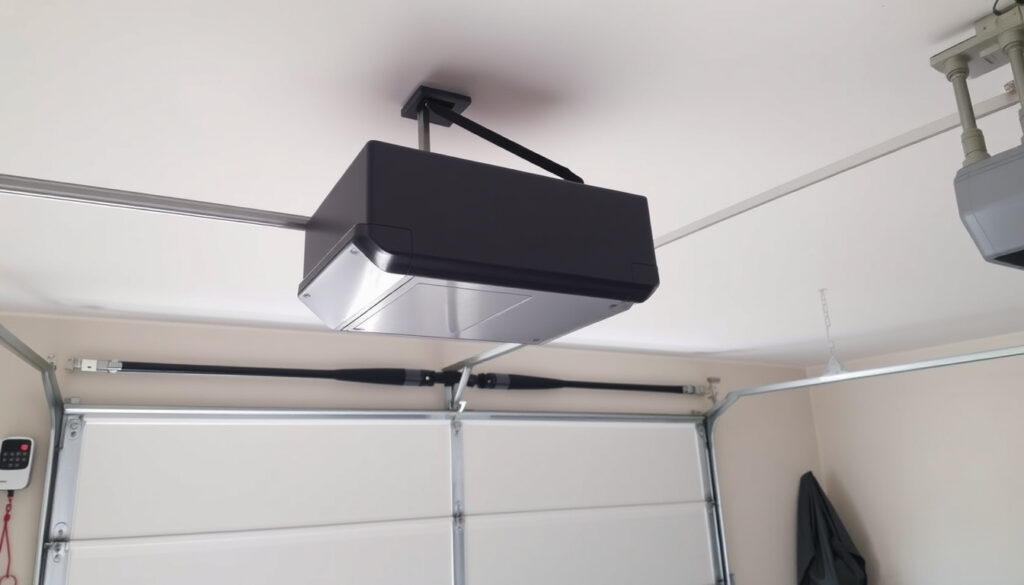
How to Program a Garage Door Opener: Step-by-Step Guide (2025)
There’s almost nothing more frustrating than walking up to your car, pressing the remote button, and getting nothing in return. Your garage door stays shut, and you’re left guessing whether the problem is the remote, the opener, or something in between. The good news: most remote issues are fixable in under five minutes, and programming a new remote is even faster — no toolbox required. Here’s exactly how to do it, step by step, across the most common brands.
Common brands: Chamberlain, LiftMaster, Craftsman, Genie, and others · Primary method: Press the Learn button on the opener motor unit · Typical time: Less than 5 minutes · Most frequent failure: Dead or weak batteries (estimated over 60% of cases)
Quick snapshot
- The Learn button on the motor unit is the standard programming method for most modern openers (Chamberlain Group Support (manufacturer documentation))
- Programming requires pressing the remote within 30 seconds of pressing Learn (Chamberlain Group Support) (Chamberlain Group Support (manufacturer documentation))
- Battery replacement resolves the majority of remote failures (Royal Garage Door Repairs (garage door service specialist))
- Whether unplugging the opener erases all remotes varies by model and manufacturer (Vision Doors (garage door service provider))
- Learn button colors differ (yellow, green, purple, red, blue) and may indicate compatibility but no universal standard exists (Vision Doors (garage door service provider))
- Whether LED light bulbs interfere with opener signals depends on bulb type and opener model (Vision Doors (garage door service provider))
- Pressing the wrong button on the motor head during programming (Royal Garage Door Repairs)
- Taking longer than the 30-second programming window (Royal Garage Door Repairs)
- Frequency mismatch between older remotes and newer rolling-code openers (Royal Garage Door Repairs)
- Advanced programming: car visor integration, wall keypads, and cloning from another remote
- Wi‑Fi-enabled openers allow smartphone control and remote programming via app
- Clearing the opener memory and reprogramming from scratch as a final troubleshooting step
Four key facts, one pattern: nearly every programming and troubleshooting path runs through the same small button on your opener’s motor unit.
| Fact | Details |
|---|---|
| Brands covered | Chamberlain, LiftMaster, Craftsman, Genie, and most major brands |
| Common issue | Dead batteries – simplest fix |
| Programming method | Learn button or DIP switches on older models |
| Safety note | Disable power to the opener before any hardware reset |
How do I program my remote garage door opener?
Step 1: Locate the Learn button on your opener
- The Learn button is usually near the antenna wire or under the light cover on the motor unit (Chamberlain Group Support)
- Color varies by brand: yellow on newer Chamberlain models, green or purple on older units, and red or blue on some competitors (Vision Doors)
- If you cannot find it, consult the opener’s manual or look for a labeled panel on the back or side of the unit
Step 2: Press and release the Learn button
- Press and immediately release the Learn button — do not hold it down (Chamberlain Group Support)
- A small LED light will turn on or begin blinking, indicating the opener is in programming mode
- You now have approximately 30 seconds to complete the next step (Royal Garage Door Repairs)
Step 3: Press and hold the remote button you wish to program
- Within 30 seconds of pressing Learn, press and hold the button on the remote that you want to use (Chamberlain Group Support)
- Keep holding the button until the opener responds
- If programming multiple remotes, each one must be programmed separately (Vision Doors)
Step 4: Wait for confirmation
- Programming is complete when the opener lights flash or you hear two audible clicks (Chamberlain Group Support)
- Release the remote button immediately after confirmation
- Test the remote by pressing the programmed button from a short distance
The entire programming cycle takes less than a minute. The most common mistake people make is holding the Learn button too long, which can erase all paired remotes — a fix that requires starting from scratch.
The takeaway: this four-step sequence is identical across every modern opener — the only variable is locating the Learn button on your specific motor unit.
Can you program a garage door opener yourself?
Yes, most modern openers allow DIY programming
- No special tools are required — just the remote control and a ladder to reach the motor unit (Chamberlain Group Support)
- Programming is a button-press sequence that takes under five minutes
- Wall-mounted keypads follow a similar process using the same Learn button
When to call a professional
- Very old models with DIP switches (small banks of physical switches inside the remote and opener) may require matching switch positions manually
- Some commercial or high-security openers require dealer-only programming codes
- If the Learn button is unresponsive after trying these steps, the opener’s logic board may need service
A service call for a simple remote programming issue typically costs $75–$150. Knowing how to program the opener yourself eliminates that expense entirely for the vast majority of residential openers.
The catch: the DIY approach saves you $75–$150 per service call, but only when the opener is modern and the Learn button is accessible.
How do I program a 4-button garage door remote?
Understanding the four buttons
- Four-button remotes typically include dedicated buttons for lock, light, and two or three door control functions (Vision Doors)
- The lock button disables remote operation from other remotes — a security feature
- The light button operates the opener’s light without opening the door
Programming each button separately
- Each button on a 4-button remote must be programmed individually using the same Learn button process (Chamberlain Group Support)
- You can program different buttons for different doors if you have a multi-door opener system
- The lock and light functions usually do not require programming — they activate automatically once the remote is paired
Using the Learn button method for 4-button remotes
- Press and release the Learn button on the opener
- Within 30 seconds, press and hold the first button on the remote
- Wait for the lights to flash or clicks to sound, then repeat for each additional button
- If a button does not respond after programming, check that the remote’s battery is fresh and properly installed
The pattern: each button is an independent pairing slot — treating them separately avoids the common mistake of programming only one button and assuming the rest will follow.
How do I reset a garage door opener?
Soft reset: unplug the opener for 30 seconds
- Unplugging the opener from the power outlet clears temporary memory glitches and can resolve unresponsiveness (YouTube (garage door repair tutorial))
- Wait at least 30 seconds before plugging it back in — some guides recommend a full minute
- After power is restored, test the remote again before attempting a full reprogramming
Hard reset: using the Learn button
- Press and hold the Learn button for about 10 seconds until the LED light goes out (YouTube garage door repair tutorial)
- This erases all programmed remotes, keypads, and vehicle connections from the opener’s memory
- You will then need to reprogram every remote and keypad from scratch
Where is the reset button on the garage?
- Most openers do not have a dedicated “reset” button — the Learn button functions as the reset control (Chamberlain Group Support (manufacturer documentation))
- Some newer Wi‑Fi-enabled models have a separate reset pinhole for network settings
- If you cannot find a Learn button, check the opener’s manual for alternative reset methods
Holding the Learn button too long during programming — rather than pressing and releasing it — will erase all paired remotes. If your remote suddenly stops working and you haven’t changed anything, someone may have accidentally triggered a hard reset.
The distinction matters: the reset and Learn buttons are the same physical control — the difference is entirely in how long you hold it.
Why is my garage door not responding to remote?
Common causes: dead batteries, signal interference, opener lock enabled
- Dead or weak batteries are the most frequent cause of remote failure — estimated to be responsible for over 60% of cases (Royal Garage Door Repairs)
- Signal interference can come from nearby metal objects, LED light bulbs in the opener, or other electronic devices
- If the opener’s lock feature is enabled (common on 4-button remotes), the remote will be ignored even if the signal is strong
How to test if the remote is sending a signal
- Stand close to the motor unit and press the remote button — if the opener responds, the issue may be range-related
- Check the antenna wire hanging from the opener: it should be straight and unobstructed
- A smartphone camera can detect infrared signals from some remotes (point the remote at the camera and press a button — you may see a flash)
Steps to reprogram the remote
- Replace the battery first — a fresh battery eliminates the single most common failure point (Royal Garage Door Repairs)
- Erase all codes from the opener (hold Learn until the LED goes out) and reprogram from scratch
- If reprogramming still fails, the opener memory may be full — some openers have a limit on paired devices (YouTube (garage door troubleshooting guide))
- As a last step, unplug the opener for one minute to reset the logic board, then try again (YouTube garage door repair tutorial)
Frequency mismatch between an older remote and a newer rolling-code opener is a growing issue as more manufacturers upgrade their security protocols. If your remote is more than 10 years old and the opener is newer, compatibility may be the root cause.
The pattern: a decade-old remote paired with a brand-new opener is the single most common compatibility gap, and it’s also the easiest to check before spending money on replacement.
What we know vs. what’s unclear
Confirmed facts
- The Learn button is used for programming most modern openers (Chamberlain Group Support)
- Batteries are the primary cause of remote failures (Royal Garage Door Repairs)
- Each remote button must be programmed individually
What’s unclear
- Does unplugging always delete all programmed remotes? (varies by model — some retain memory, others wipe it)
- Unplugging the opener for 30 seconds — does it reliably reset memory? (evidence comes from low-tier tutorials, not manufacturer documentation)
- Are all Learn button colors the same? (yellow, green, purple, red, blue — no universal standard) (Vision Doors)
- Can LED replacement bulbs always cause interference? (depends on bulb and opener model, and evidence is largely anecdotal)
The overall picture: reliable sources agree on the core steps, but the uncertainty around reset behavior and interference means the same fix might not work twice on different openers.
Expert perspectives
“Press the Learn button on the garage door opener or wall control, then press and hold the button on the remote you want to program.”
— Chamberlain Group Support (manufacturer support documentation)
“Within 30 seconds, press and hold the remote button until the opener light flashes.”
— Home Depot Project Guide (home improvement retailer guide)
“Release the remote button once the opener lights flash or a click is heard.”
— Bulldog Garage Doors (garage door service specialist)
The pattern across all three sources is consistent: the Learn button initiates a 30-second programming window during which the remote is pressed and held until the opener confirms. The confirmation signal — flashing lights or clicks — is universal across brands and models. For the homeowner, this means that learning one method effectively covers most scenarios.
youtube.com, reddit.com, youtube.com, support.chamberlaingroup.com, farnsworthgarage.com, youtube.com
Frequently asked questions
Does unplugging the garage door opener reset remotes?
Unplugging the opener for 30 seconds to one minute clears temporary memory and can resolve unresponsiveness. Whether it erases programmed remotes depends on the model — some retain memory during power loss, while others require full reprogramming after being unplugged.
What are common garage door opener problems?
The most frequent issues are dead remote batteries (over 60% of cases), signal interference from objects or LED bulbs, the opener’s lock feature being enabled, and the 30-second programming window expiring before the remote is pressed. Less common problems include frequency mismatch and full opener memory.
Why is my remote not working even with new batteries?
If fresh batteries do not resolve the issue, the remote may need to be reprogrammed. First, erase all codes from the opener by holding the Learn button until the LED goes out, then repeat the programming sequence. If that fails, the opener’s memory may be full, or the remote may be incompatible with a newer rolling-code opener.
How do I fix an unresponsive remote?
Start by replacing the battery with a fresh one. Then check that the opener is receiving power and the safety sensors are clear. Reprogram the remote using the Learn button method. If the remote still does not work, unplug the opener for one minute to reset the logic board, then reprogram from scratch.
How to tell if a remote needs new batteries?
Signs include reduced range (you need to stand closer to the door), intermittent operation (the door opens only after multiple presses), or the remote LED being dim or not lighting at all. If the remote is more than one year old and has not had a battery change, replacement is the first step in troubleshooting.
How do I program a garage door opener with three buttons?
Three-button remotes work the same way as single-button models. Press and release the Learn button on the opener, then within 30 seconds press and hold the desired button on the remote. Wait for the opener lights to flash or two clicks to sound. Repeat for each button you want to program.
How do I program a garage door remote without a remote?
If you do not have a remote, most openers can be programmed using the wall-mounted control panel or keypad. Press and release the Learn button, then enter a PIN on the keypad and press the Enter button. For car-integration systems, follow the vehicle manufacturer’s instructions — most require pressing the Learn button and then a button inside the car.
For the homeowner with a non-responsive remote, the path forward is straightforward: replace the battery first, then reprogram using the Learn button. If those two steps fail, a hard reset (holding Learn until the LED goes out) followed by a fresh programming cycle will resolve the vast majority of cases. For the remaining 5% — typically involving frequency mismatches or logic board failures — a homeowner should contact a licensed garage door technician rather than replacing the entire opener unnecessarily.
Related guides: How to Fix Pixelated Video: Causes, Tools, and Step-by-Step Guide · How to Forward Calls: iPhone & Android Settings Guide
More related posts
 Best 2 Player Card Games: Fun Picks for Two
 Tour de France Live 2026: TV Channels & Streaming Guide
 Real Madrid vs Liverpool: History, Finals, and How to Watch
 Ireland Soccer Jersey 2025: Design, Price, Where to Buy
 Ireland November Internationals 2025: Full Schedule
 How to Change Default Printer – Guide for Windows, Mac, Mobile
 Devil Wears Prada 2: Release, Cast, Streaming & Reviews